DOLLOWBEL PROCESS WRITEUP (slash how to make a fairy-sized doll)
by hollowbel, the forest fairie | 2026-03-10
Greetings, fairy friends! Isn't Dollowbel cute? Perhaps you're interested in making your own approximately 1/10 to 1/12 scale anime-style doll? I'll show you how this doll was made, along with suggestions for anyone attempting a similar project oneself.

For some context: I'm Hollowbel the forest faerye, and I stream on twitch occasionally. I'm rather fond of plastic modeling, and have built / painted approximately fairy-sized human kits before. It's fun to build and customize a character! The largest manufacturers of said kits are Kotobukiya (Megami Device, Sousai Shojo Teisen, Frame Arms Girl etc.) and Bandai-Namco (30MS, 30MM etc.), with Kotobukiya's being more expensive but usually more intricate. These kits have a variety of styles but they're generally mecha musume (moe girls with mechanical armor) or fantasy / robotics, though modern-wear (Sousai Shojo Teisen) and character kits exist too. These kits are usually around 1/12 to 1/10 scale- 15-20 cm tall, which is rather conveniently my height...
Finding a body
My first step was to look for a doll body to use as a base. Important priorities were:
- Around six inches / 15 cm tall
- Around 5 - 5-and-a-half heads tall
- Anime / cartoon-style, rather than too realistic
- Sturdy
- Capable of different expressions / easily customizable
Even though I'm familiar with plastic models, I've also been curious about ball-jointed dolls (BJD) for a while, so I considered them as an alternative. Despite differences in construction (ball joints and strings vs. plastic joints) both are small dolls with similar considerations in construction and clothing. They have the advantage of being sculpted as a human body rather than having plastic clothes built into them, making dressing them in fabric clothes easier; they're also sturdier than plastic models, as plamo joints can wear easily if flexed often and not cared for properly (Hollowbel tip: sand your joints! Don't ask how I know...). I like that they have poseable eyes too! Plastic model kits tend to have eyes printed directly on the plastic, though there are exceptions I'll cover below.
Unfortunately, BJDs at scales less than 1/8 are actually quite uncommon! The usual scales are 1/3 to 1/6, the latter most well known from dollmaker Volks' Yo Super Dollfie series (about 26cm). 1/10 and 1/12 dolls are few and far between. A common suggestion I came across was the Obitsu 11, which while not ball-jointed is anime-style and easily customizable. I considered it, but it was slightly too chibi for the project-- with a Nendoroid head it's about 3.5 heads tall! Other doll bodies studios have made at this size tend to be similarly scaled, though some dolls / action figures have more realistic proportions, and there are 3d printable dolls at this scale in a variety of shapes.
I ended up settling on using a plamo girl base, as it's what I'm most familiar with and the size and proportions were fitting (they're often around 6 heads tall). The B1R-M Chassis kit series are a recent series intentionally designed as doll base models with skin-tone and clothed parts for easy customization (there are enough parts for a second doll, so some of these photos may have a second character around). They also have faceplates with eye holes and round poseable eyes! Kotobukiya seems to be working these into some of their newer model kits, which I'm very excited for; they add an extra lifelike touch. I chose the B1R-M Chassis Kit B for Dollowbel because the face was cute!
But what if I want...
Most plamo character kits I've discussed are of similar body types (moe anime girl). If you want to build a character with a more masculine silhouette... Bandai's 30MM and 30MF kits have some fitting builds if you're interested in robotics or fantasy, though armored or clothed; Kotobukiya has some examples too but not many. It's a common approach for people to make boy characters by masculinizing girl kits, whether using clothes to suggest form or tweaking body shape with epoxy putty, sandpaper etc, which I think is amazing. Stepping outside plastic models is probably easier, as there are plenty of masc BJDs available; I know at least one friend who's 3D printed stringable dolls too. If you're making an animal character, I'm excited for the Kemopla line releasing in 2026- they're anthro kits with swappable parts for varying degrees of furry (big paws vs. human hands with paw pads, long vs. short snout).
If you have a character in mind that doesn't have a premade kit close to their form, it might be worth looking into 3D printing- there may be someone out there who's made a similar form! If you can find a doll / body that's close to your desired form, you may be able to sculpt parts with putty or clay to complete the difference, or use clothes to suggest a form more like what you're looking for.
Custom components
Most likely, your character won't look exactly like the kit / doll you ordered, and you'll need to customize the base form yourself. I like to paint my kits and intended to sew clothing for Dollowbel, but the changes to the body structure I wanted were as follows:
Hairstyle and pointy ears
Believe it or not, I wasn't able to find a model kit with pointy ears, or low twintails! It's surprising, right? Everyone loves elves...
For long hair like mine, I was reticent to sculpt entirely from putty- if solid, they're heavy enough to be load-bearing by themselves. There are a reasonable amount of independent creators making pieces compatiable with preexisting model kits, and I was able to find one with elf ears. (Be careful if you look for custom bishojo kit pieces as a lot of custom sculptors' works are NSFW!) I ended up buying two hair kits and did some messy surgery with a drill, knife and putty to attach the twintails from one to the back of the other with plastic joints.

I added hair vents as well with putty! This was pretty straightforward as they weren't load bearing, but required some trial and error because I'm not used to working with putty... Sculpting hair is hard...
Antennae
These were pretty straightforward- drilling holes into the sides of the back hairpiece and inserting short lengths of copper wire.
Wings

I followed this tutorial using Angelina film and copper wire! I traced stencils to glue the wires to the film for the forewings and hindwings separately, then heated each to tighten / color the film. Be careful not to leave the flame in one space for too long if you do this- it's easy to melt holes in the film if one part of the wing gets too hot.
I hoped if possible to have the wings be detachable for ease of posing / ability to change clothes. At first, I drilled four holes in the doll back for the wing wires to rest inside. In practice, there wasn't enough tension between the wire and hole, and the wings rotated easily from their weight. I decided to use magnets instead- for each side of the body, I expanded the two holes and glued 2mm neodymium magnets inside, then glued one forewing and one hindwing together by the stems and attached equally-spaced magnets to the stems. Getting the polarity right was essential! Because two magnets are used instead of one, it's harder for gravity to rotate the wings out of their intended positions.
They work great now and are easily detachable, but I'd recommend some caution- stronger magnets might be ideal, as they're the weakest link and a bump can cause them to rotate. The Angelina film detaches from the wire rather easily too, unfortunately- I haven't found a solution for this, and it might be worth using an entirely different approach for wings of your own. They're very pretty, though!

Cicada eyes
I'm a cicada fairy! Did you know? Cicadas used to terrify me, but they're actually very cute once you get to know them...
I felt reasonably sure model kit cicada eyes were a Hollowbel-specific need, so I used some Tamiya Epoxy sculpting putty to make them myself. I drilled a hole into the center back of each eye and matching spots on the hairstyle, then added a length of wire to connect them.
Fairy eyes
Well, I guess both sets are fairy eyes... I'm talking about the ones on my face, though!
The model kit I used came with two sets of eyeballs, one with an anime-style print on them and another blank. These make it easier to draw your own eyes on-- in my case, I'd been captivated by ball-jointed doll eyes; many sculptors have created intricate resin and glass eyes with realistic depth and reflection. Other model enthusiasts actually suggested using fish lure eyes! Apparently some fishers get very into making fishing lures, and there are fish lure eyes with hyperreal effects like iridescence and wild colors. I used 3mm gray iridescent fish lure eyes for Dollowbel; they're lovely! Though relative to such a small doll they are quite large, so if you want small irises you might be better off using 2mm eyes or looking for an alternative. (I altered the shape of the face plates' eyeholes slightly, making them droopier and larger, which helped the irises appear slightly smaller.)
Painting
I love this part! Gunpla and garage kit (custom anime figure) communities have lots of great painting advice. I use an airbrush and you can get a cheap one with compressor for not an enormous amount of money; plenty of people handpaint kits too though it's more time-consuming.
I used a flesh tone for the skin pieces. The clothing parts (top and shorts, gloves and socks) use Alclad II Steel over a burnt brown for a lightly shiny fabric. I masked out the area on the back where the wing magnets attach to leave uncovered by the top. Hair is my favorite to get fancy with; I used a few shades of gray plus an indigo for striking highlights, and used orange-red paint for the cicada eyes.
The top coats go a long way here- skin and hair use matte, but making the cicada eyes and antennae semi-gloss and gloss makes them contrast better.
Painting the faces

I usually use decals for face details and only freehand paint lines I don't mind being messy, so this was intimidating! I used Plum Workshop's garage kit guide for face painting advice. I used a 5/0 paint brush for the thick eye lines and a very thin 20/0 for lashes, eye crease, and mouth.
Importantly, I painted the skin using lacquer and sealed with a top coat before starting on the face, and used acrylic paint for the face details. This way, it was easy to wipe off misstrokes on the face with water and retry without disturbing the skin's paint. Using different paint types so you're able to just redo the face is essential (I retried several times). Doodling the faces at my desired scale helped get the muscle memory down!
Clothes

The chestguard, belt, pouches and bracers are made of pleather, and the skirt is made of patterned cotton and embroidered with embroidery floss. This was my first time making doll-sized clothes and my first time embroidering! My suggestion for building doll clothes is to learn how to make clothes in your size first. Maybe that's not helpful, though...
Human-sized clothes can be pretty reliably scaled down to doll size by shrinking the pattern if they're simple enough- the main challenge is making sure you can join the pieces together, as there's less seam allowance for sewing pieces together. It's possible and common to just glue fabric together for doll clothes-- even if such fabric might be uncomfortable to wear, dolls don't have nerve endings, so it's fine... I handsewed them, though, with a bit of machining on the skirt as it's larger. My outfit's roughly drawn from lolita fashion, so I used patterns from Otome no Sewing as bases for the chestguard and skirt. Both fasten in the back with velcro and hook loops, like human-sized clothing might. The skirt's a box skirt with three apron-like pieces arranged around the waist evoking flower petals; I'm really happy it worked as well as it did when translated to actual fabric!
Things I did that might be helpful for creating your own doll clothes:
- Referencing actual clothing and clothing books (doll-sized or human-sized)! I used はじめてのどーる 布服レシピ; it had doll clothing patterns and suggestions.
- Making test patterns first! By making them on paper and muslin, it was easy to try them on without making the full piece and make adjustments. Most of Dollowbel's pieces went through at least one previous iteration.
- Using a fray glue on free edges rather than hemming loose ends- hems are bulky, and fabric layers are much more obvious at smaller scales.
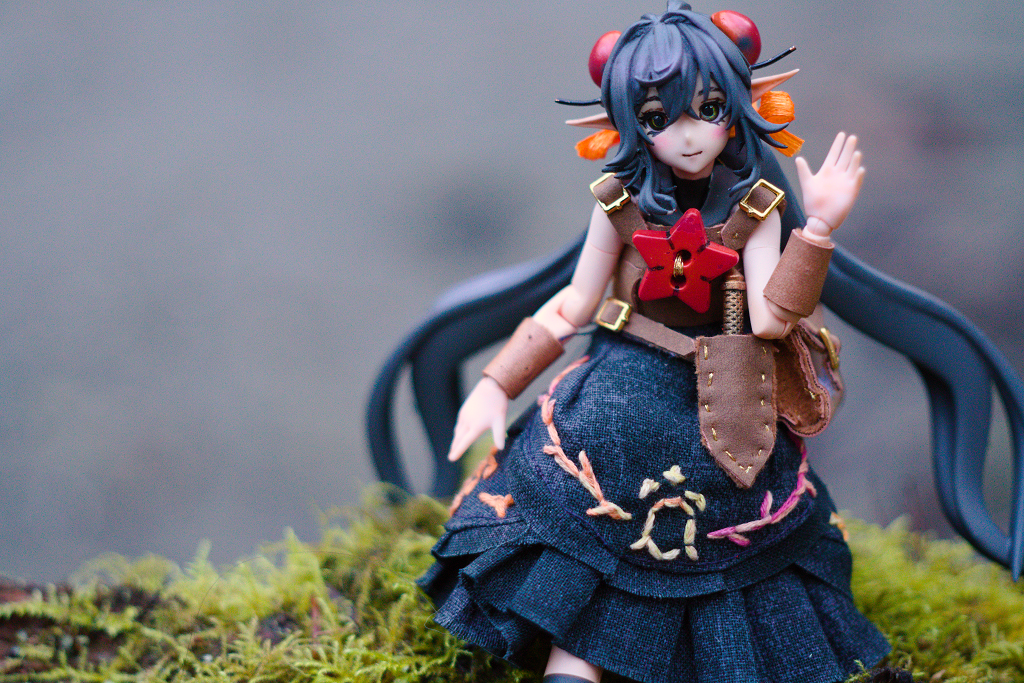
The finished doll

Thank you for reading! I really love crafting and sewing, so I hope this made dollmaking feel even a bit approachable. If you have any comments or questions, feel free to stop by my stream, or whisper them into a flower when nobody's watching ^_^